
Docs · Release notes
8.0 - Release Notes
Version 8.0 continues the theme of productivity and usability - making it quicker and easier to build than ever before! This is our first major release in nearly two years and it is jam packed with exciting big new features as well as lots of smaller improvements and fixes!
What's New
Apps
Viewports Rework
Making your App look good and work well across a wide range of different devices can be very challenging. As this has become a more common occurrence, users have pushed the limits of the original viewport functionality in the App Designer and have inevitably found it difficult getting their App to look exactly how you want it to across mobiles, tablets, desktops and widescreens.
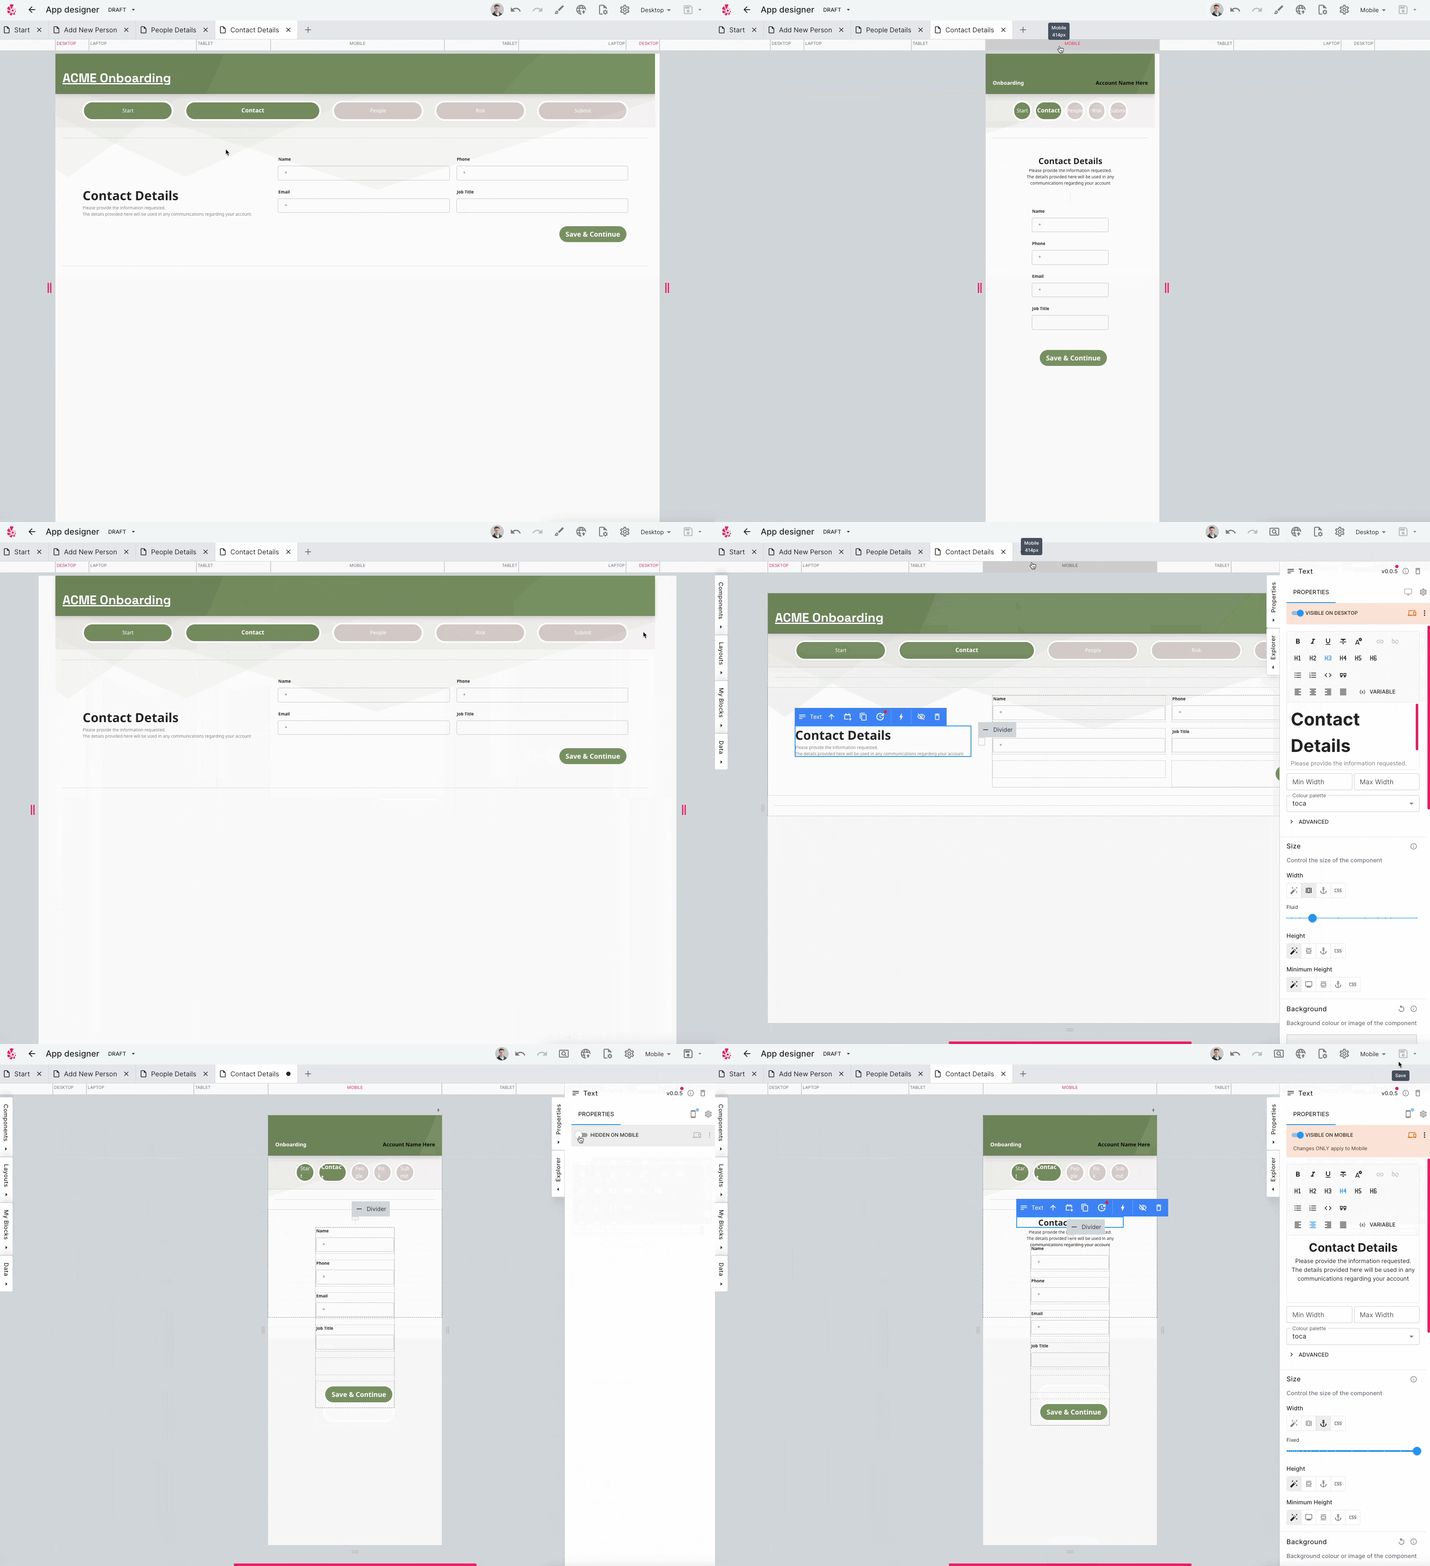
This rework of the viewports functionality makes designing your App pages for multiple devices clearer and easier than ever before. There are three key changes that have been made:
- Viewport Modes - This allows you to toggle how your App should respond when viewed on different devices
- Responsive Overrides - Gives you more granular control over how each component behaves in different viewports
- Interface Redesign - It is now easier to toggle between different viewports and see how your App looks between them
Snap to Viewport vs Fluid Width
There is a new toggle in the Theme section of your App to toggle how your App responds to different viewports, your App can either "Snap to Viewport" or respond via "Fluid Width".
- Snap to Viewport - This is how you will be used to it working and will restrict your page to only be as wide as the largest viewport that fits into the current device.
- Fluid Width - This will tell your App to use all available width it has
From the Theme section, you can also configure how wide each of these Viewports are so that if there are devices that sit between certain Viewports you can simply change the width to accommodate these devices.
Checkout this article for more information about the different type of viewports.
Responsive Overrides
Each component that you drag onto your App page will now have a new property at the top of the Properties panel which allows you to configure whether the component is visible on the current viewport and whether it has responsive overrides enabled. If responsive overrides are enabled then that means that you can configure your component to behave differently in the current viewport than in the other viewports. If you have this setting disabled then your component will behave the same as you have configured it in your default viewport. Take a look at this article to learn more.
Interface Redesign
The App Designer now has a Viewports bar that goes across the top of your page and you can click on each distinct viewport to change the current view. You can also now drag the width of your app page across the different viewports in both design and preview mode to see how your page will behave and look across the different viewports. This makes it much more seamless to switch between viewports and allows for easier testing of how your page will look for different devices.
Automation
Table Enhancements
Tables continue to be one of the most used and relied upon features in the Toca platform and in version 8.0 we have added a suite of new features which make Tables even more powerful and performant.
Indexes
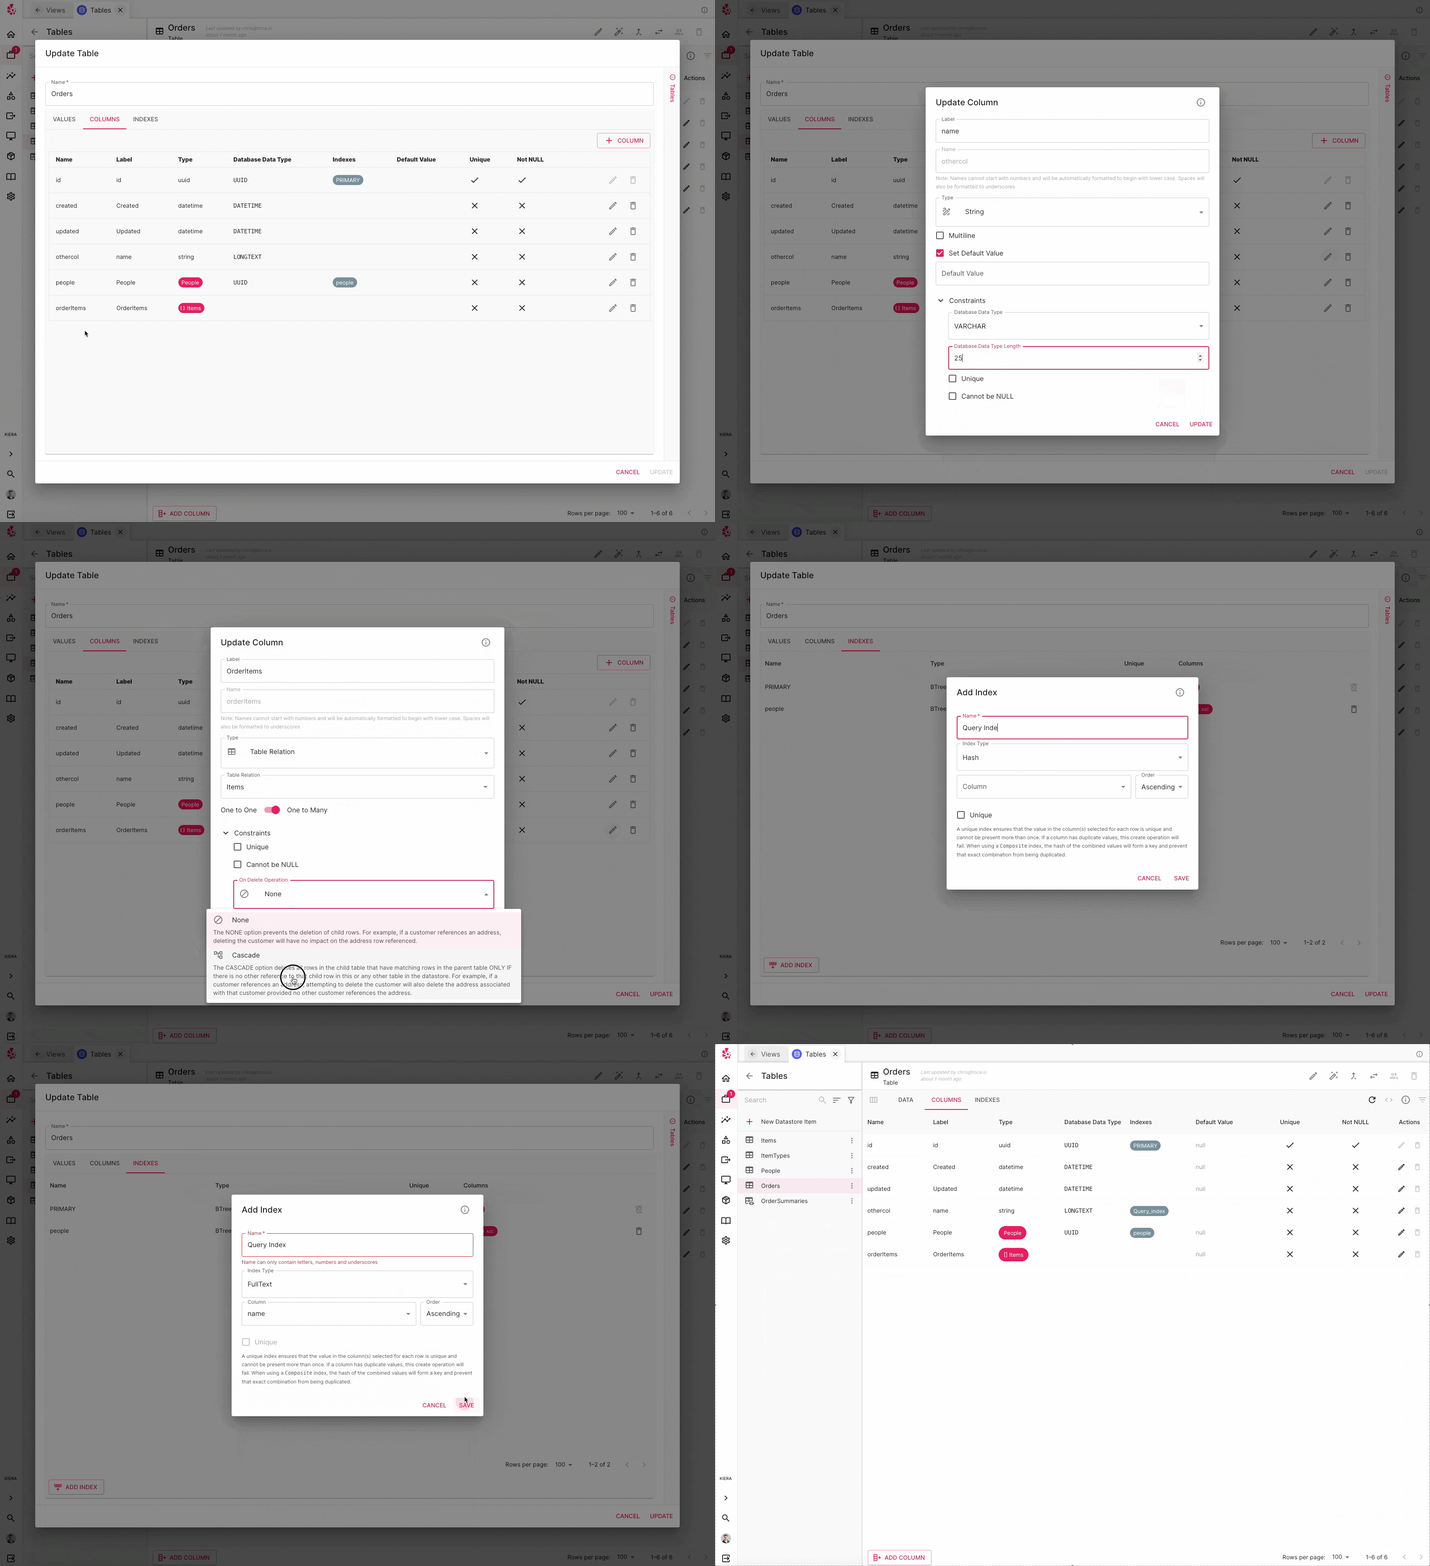
You can now add custom indexes to columns in your Tables, this is particularly useful if you wish to improve performance when querying certain columns in a large table. This is also useful if you are joining two or more tables in a View but you are using a column other than the ID column to join on. There are several different types of index that you can apply to a Table column, each with their own purpose. You can read more about the indexes here to find out more.
Database Data Types
Tables in Toca are really an abstraction on top of SQL Database tables and for a long time we have purposefully hidden away some of the finer details of how they work. Now we are seeing more and more complex projects being built on Toca we are opening up the ability for more advanced users to specify what the underlying database type each table column should be. If left unselected, Toca will automatically apply a sensible default type but now if you have a use case to, you can specify the precise type. Picking the right database type for your column can not only help with the general performance and storage utilisation but can also act as a powerful constraint when used correctly.
For example, if you want to restrict data which is more than 50 characters being entered into a String column, you can now specify that the column is a VARCHAR column of length 50 and this will then error if you try and enter data larger than 50 characters into that column!
To learn more about this new feature, take a look at this article.
Constraints
There are now several things you can do to constrain what counts as a valid value to enter into a table cell. These are as follows:
- Cannot be Null - This means that you can not enter a blank value for this column, this ensures all cells in this column will have a value
- Unique - This forces each value in the column to be unique
Cascading Delete
You can now get data that is related to a row to be automatically deleted when you delete the parent row. This will work both for 1 to 1 and 1 to Many relationships in Tables. Imagine you have a customers table and an orders table and each row in your Customers table can link to many rows in the Orders table, when you delete a Customer, you also want to delete their Orders and this is where the "Cascade Delete" feature comes in useful! It can automatically do this cleanup for you. You can read more about this here.
Auto Increment
For table columns which have a Number type, you can now specify that the column should automatically increment so that means that every time you add a row, the value in this column will increase by +1 compared to the previously inserted row. This is very useful for preserving some sort of order but be aware that if you delete rows, the auto increment will resume from the last number in the sequence, not the last number that is currently in the table.
Advanced Views
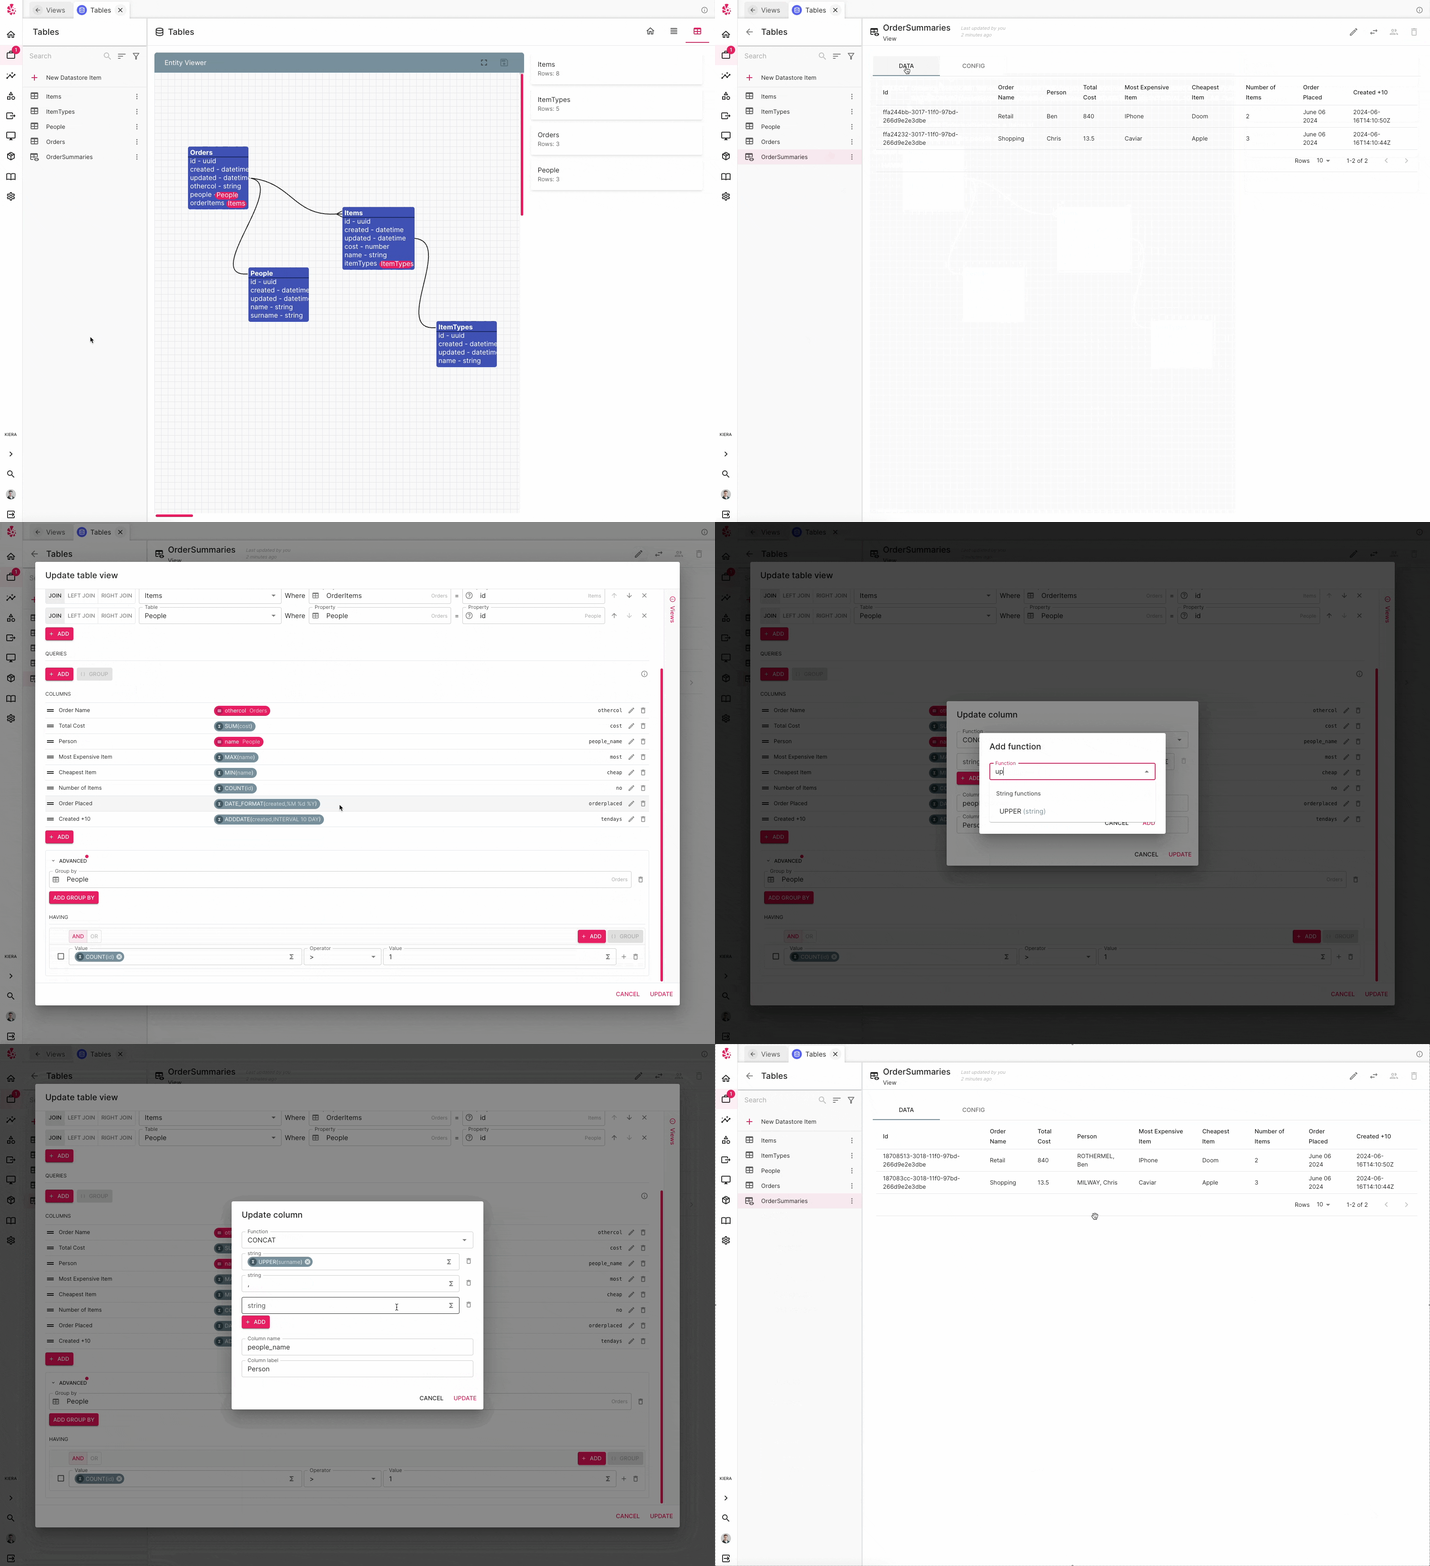
In version 7.8 we released Views, a way of joining tables and returning data against a persistent query. In version 8.0 we have supercharged the functionality and usefulness of Views as you can now apply functions to columns in your Views as well as group data together using the "Group By/Having" feature.
Group By / Having
The new Group By feature allows you to aggregate data directly in your view and then you can specify a "Having" clause to filter those aggregates. Imagine you have an Orders table and you want to sum the value of all orders per customer where the orders are over £50.00, you can now specify a View where you group by Customer ID and you would specify only rows having a value of over £50.00.
SQL Functions
You now have a wide array of SQL functions at your disposal so you can manipulate data directly within your View rather than having to use Automation to do it for you. This functionality includes but is not limited to: counting, numerical analysis, text manipulation and date calculations - all directly from your View!
Bot Pooling
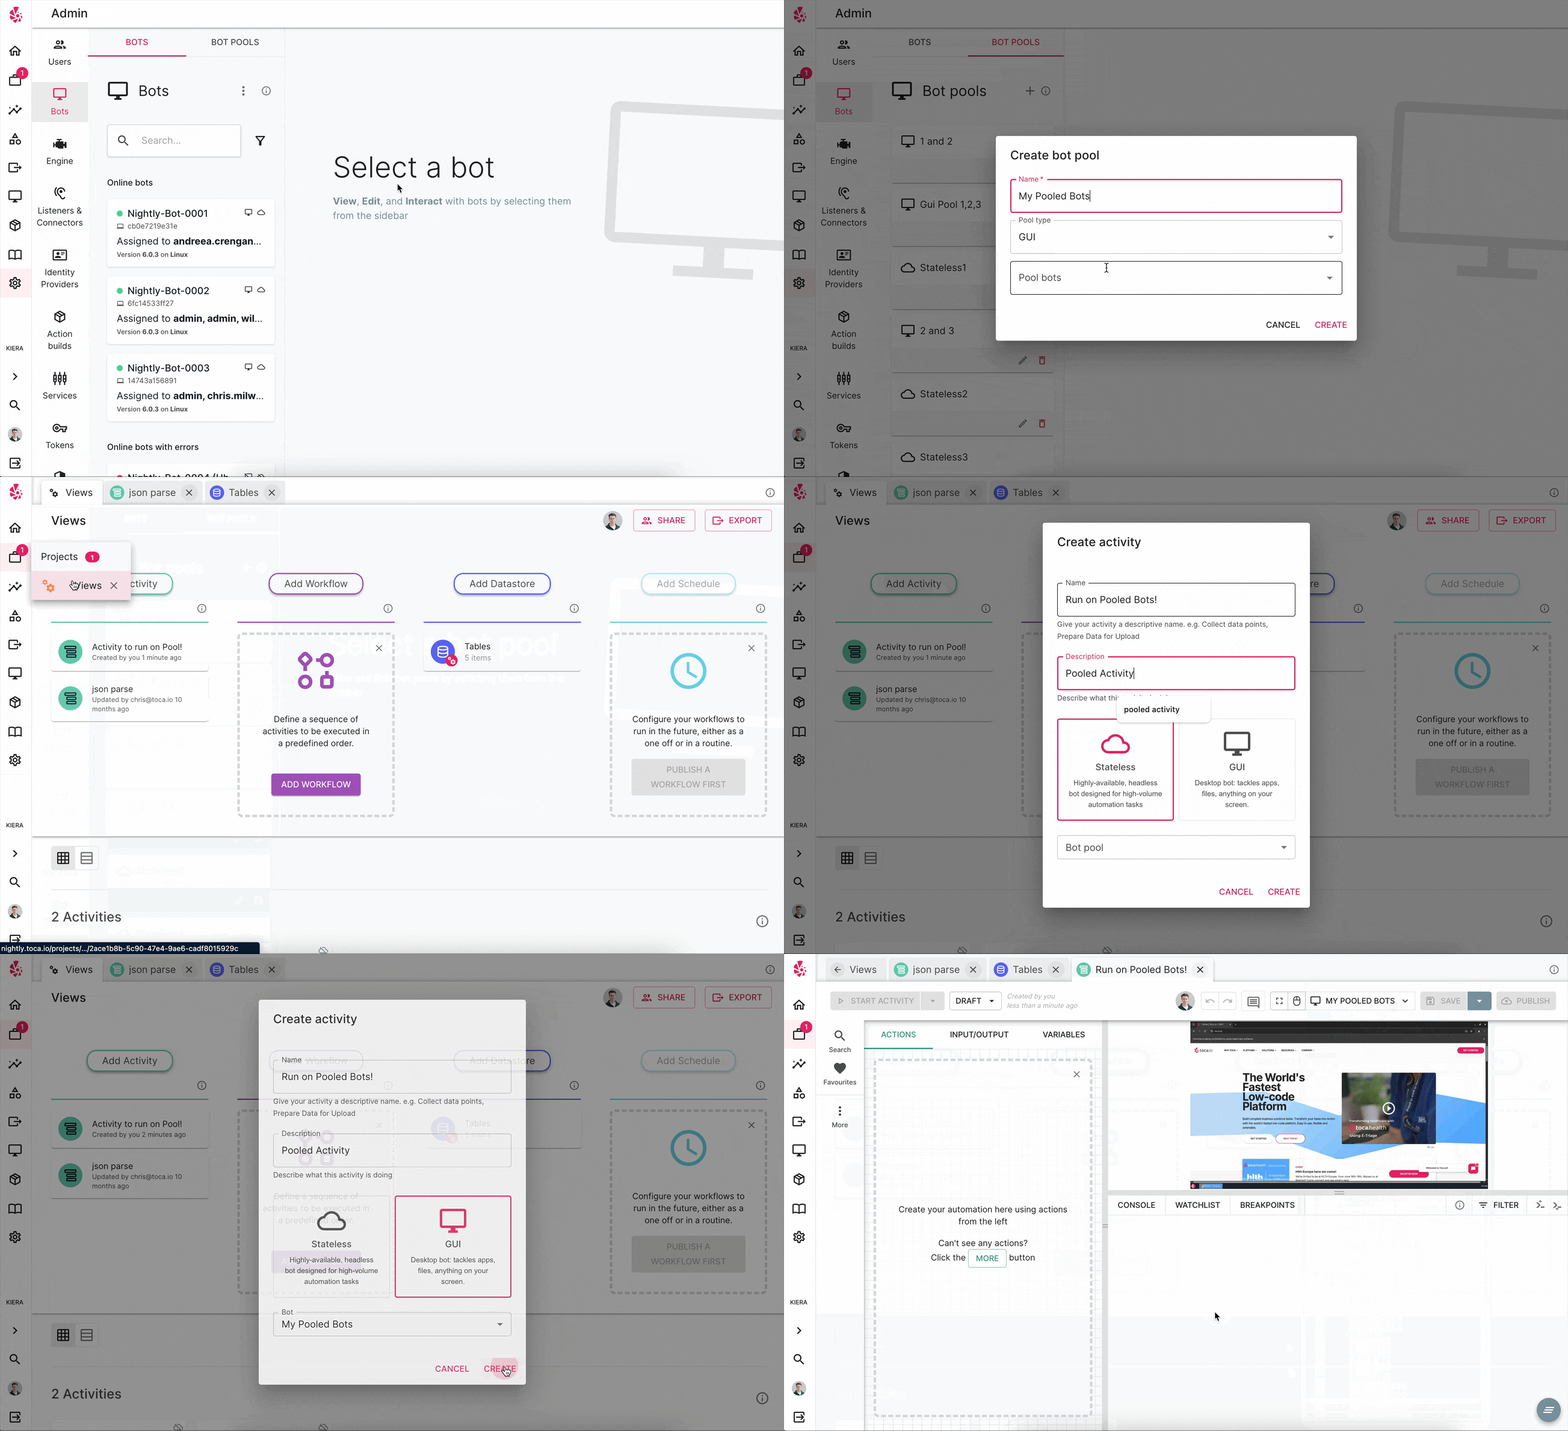
Bot Pooling allows you to group together either GUI or Stateless Bots into pools and you can then assign an Activity to run against a particular pool. When the activity is run either in a Workflow or as a standalone Activity, it will then choose the best Bot at the time to run the activity on. This will be particularly useful for running high volume GUI automation! Head on over to the Admin -> Bots page to create your first pool and you'll then be able to select that pool when assigning a Bot to an Activity.
Action Status Result
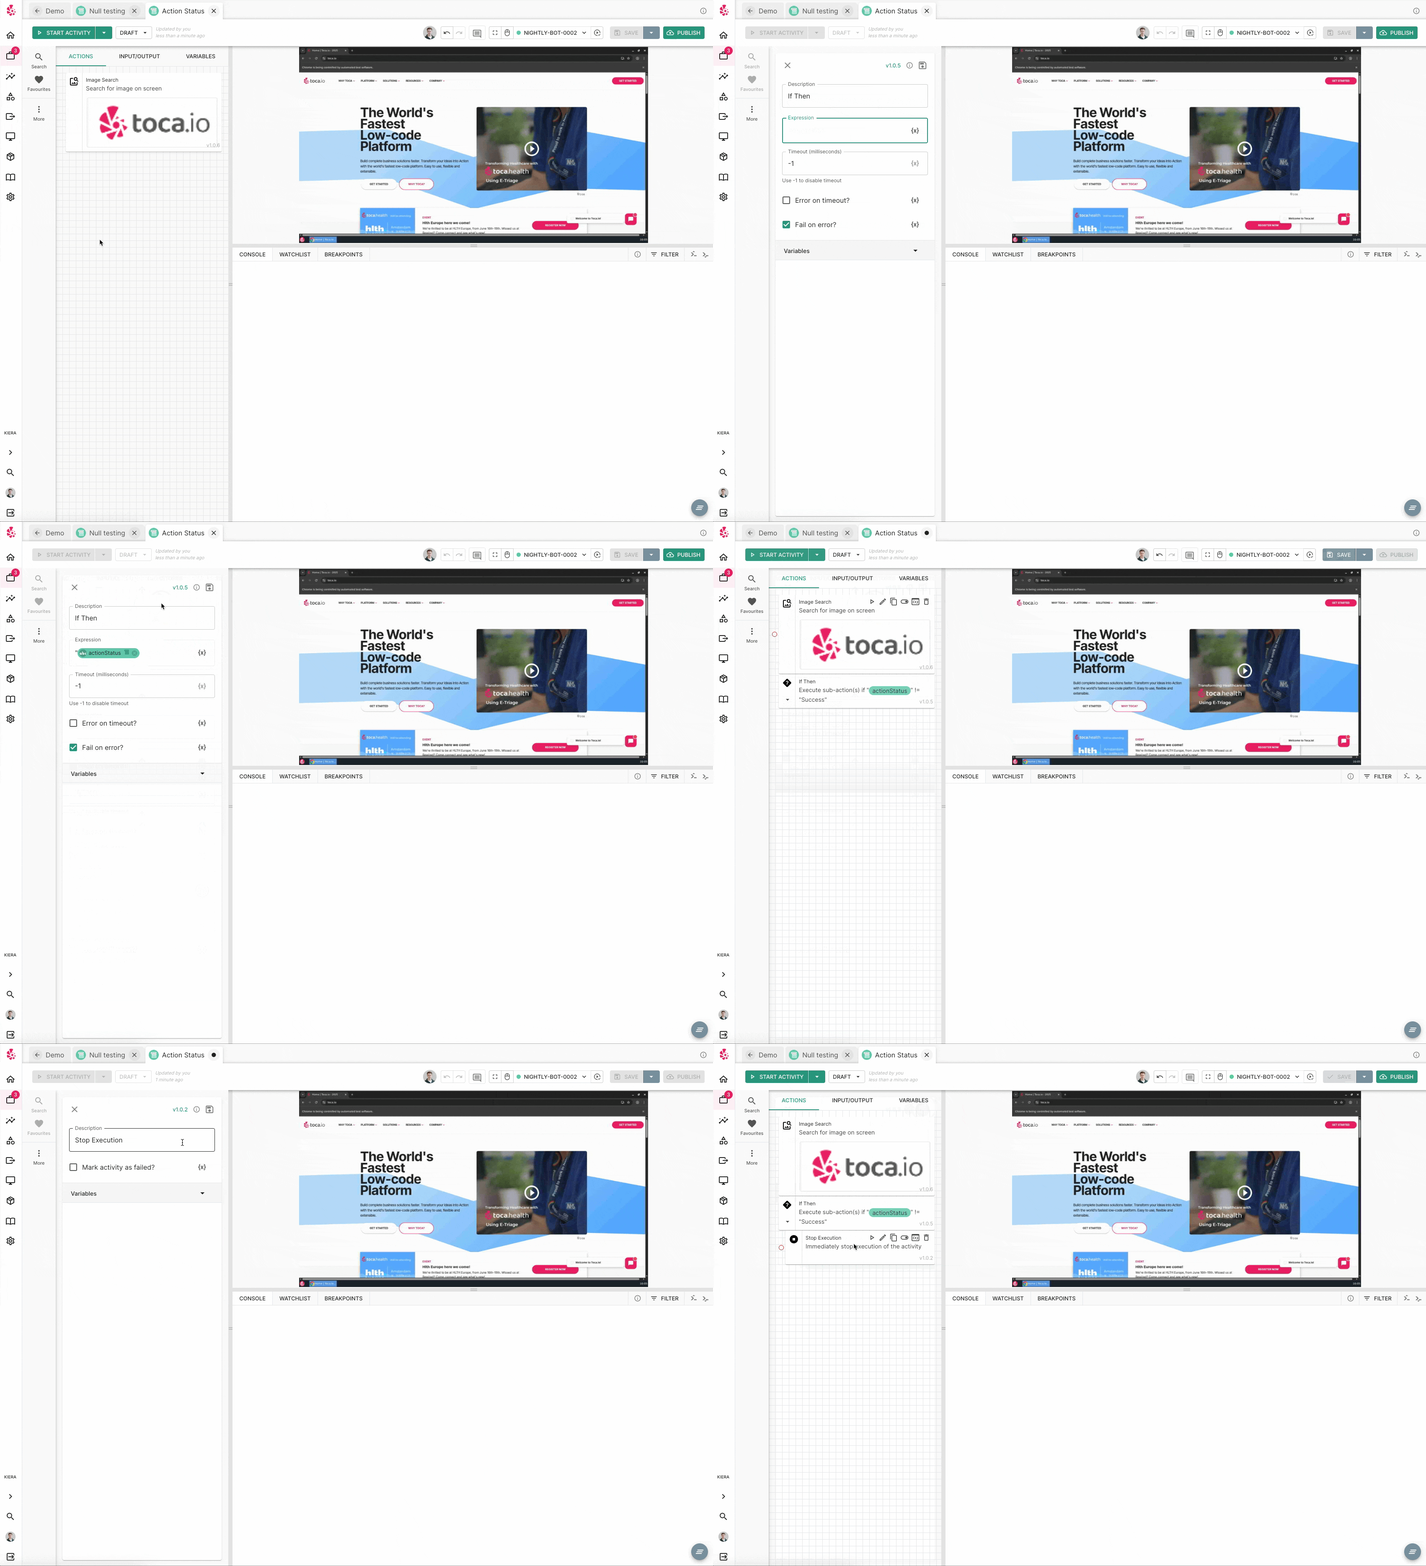
Every Action that you place down in an Activity now has a new result datachip called "actionStatus" which will return the status of that particular Action. This will be very useful for adding error handling logic inside your Activities.
General
Environment Variables in Import/Export
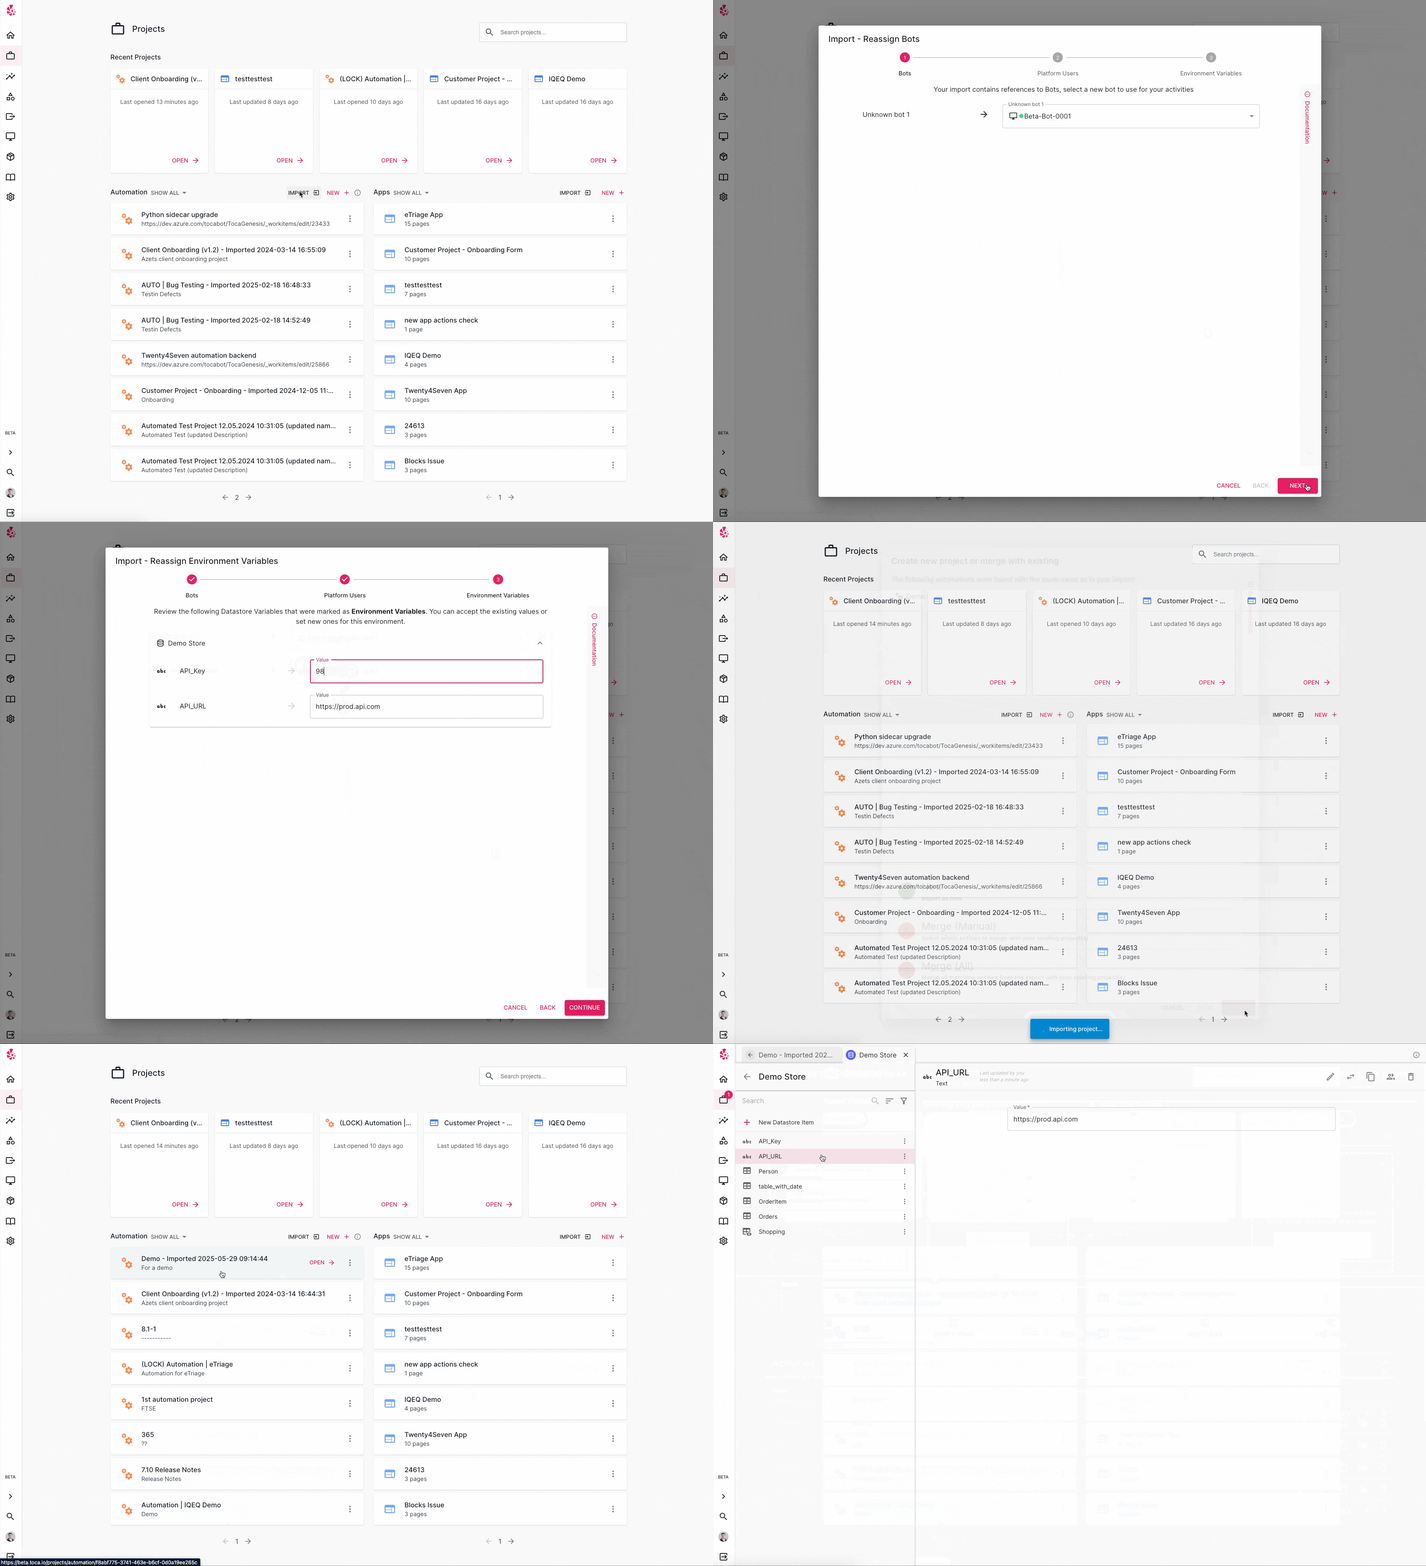
You can now set the values of Datastore Variables when you Import an Automation project. This is very useful for things like API URLs or API Keys and Credentials which may change between environments (e.g. Dev to Prod). You mark the variables as "Environment Variables" when you export the project and then the Import wizard will give you the option to remap the variables.
Copy Action Results
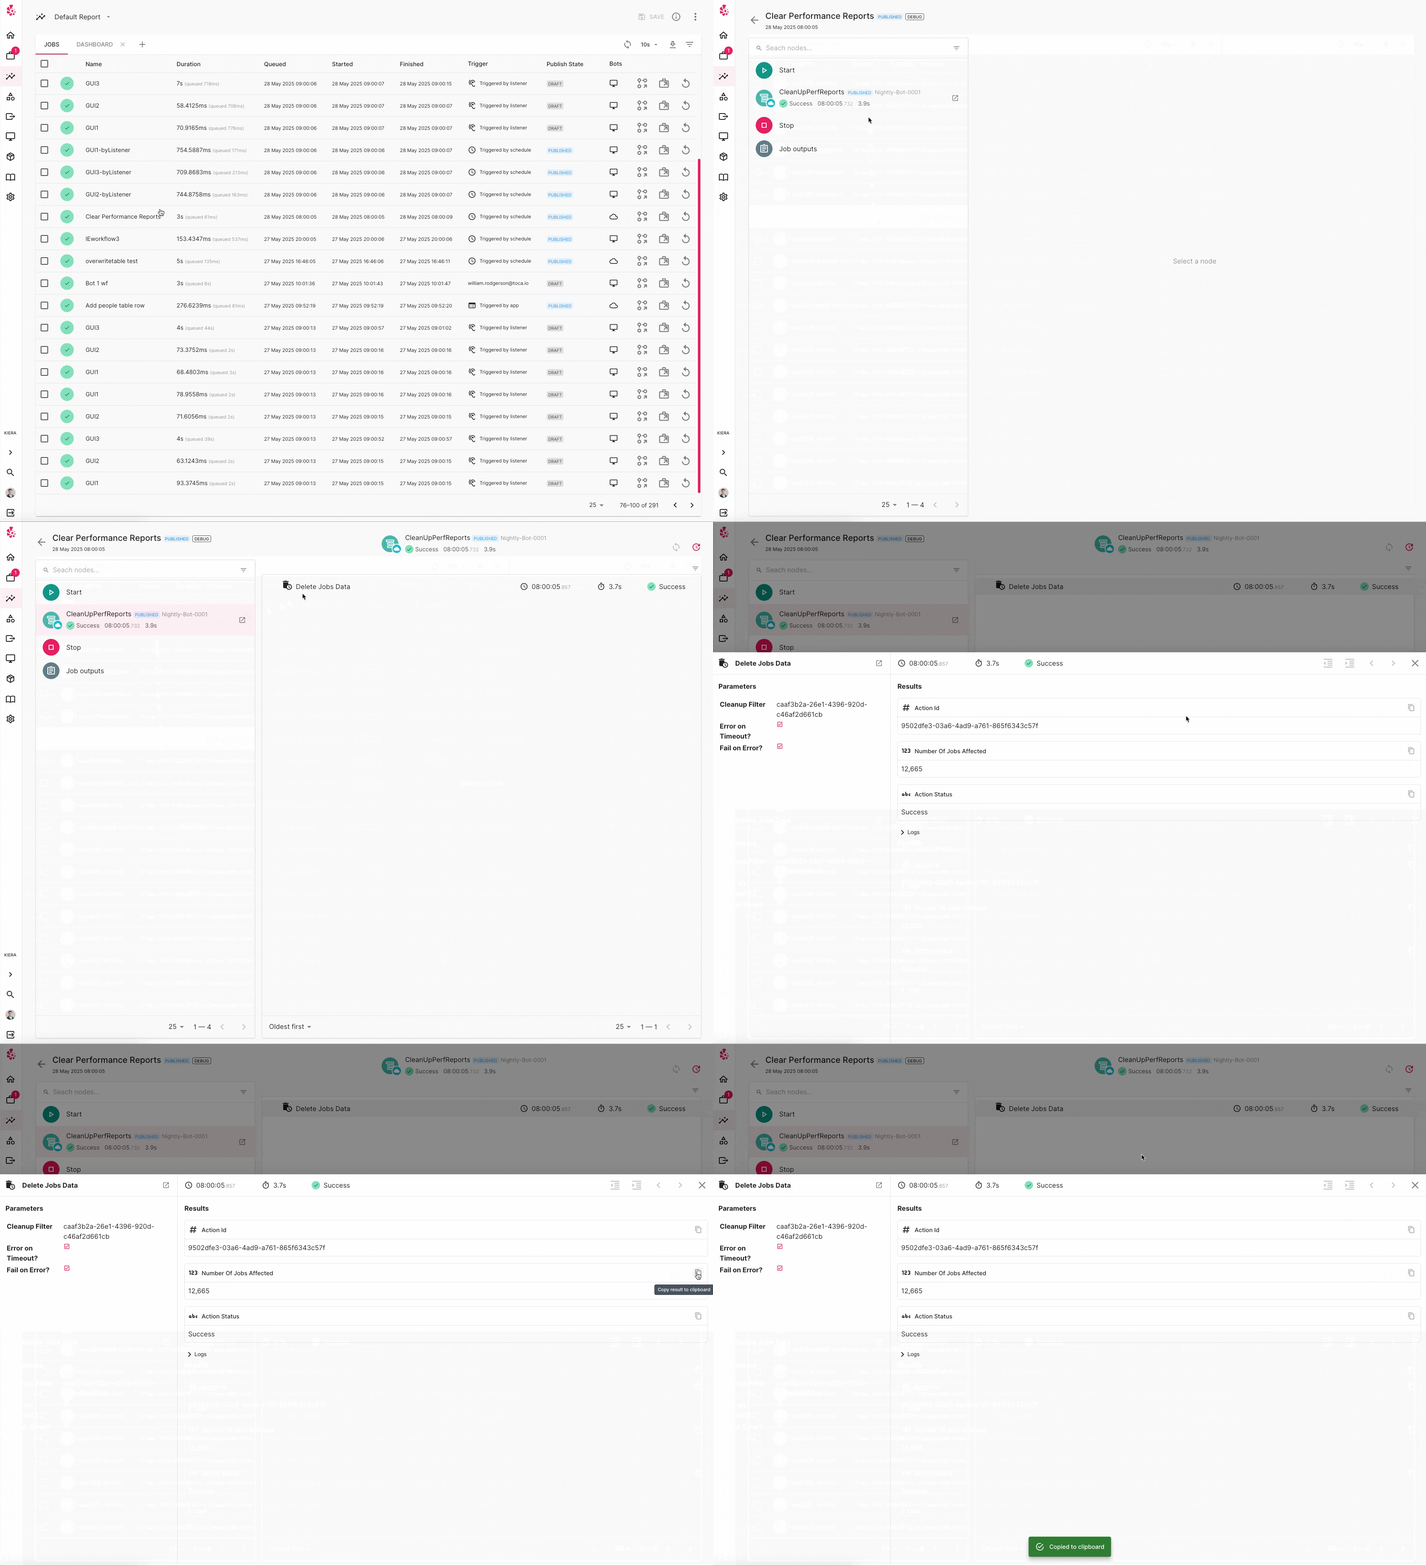
When viewing the results of running automation, either in the Activity Designer console or in the Reporting screen, there is now a button that allows you to copy the individual results of an Action simply and easily.
Bug Fixes
A number of bug fixes were included in this release across the platform.
Contact <support@toca.io> for a full list of bug fixes included within this release.
Deprecated
We have dropped support for having IPL differ per viewport in App Pages. Historically, you could have had IPL run off the same event for the same component but behave differently in each viewport. This led to confusion as it was difficult to identify where this was the case and hard to debug. We have now dropped support for this and recommend using the new Responsive Overrides settings to get your components to behave differently per viewport.
The following action versions are no longer supported and will not work in Version 8.0:
| Action Name | Unsupported Versions |
|---|---|
JSON Parser | 2.x.x, 1.x.x |
Table to List | 2.x.x, 1.x.x |
Concatenate Tables | 2.0.0, 2.0.1 |
Delete Table Rows | 3.0.3, 3.0.2, 3.0.1, 2.x.x, 1.x.x |
These actions will be automatically upgraded to their latest supported versions when your Environment is updated to Version 8.0.
If you note any issues with these actions after the upgrade, please contact <support@toca.io>.