
Docs · Guide
How Everything Connects
Understanding how data flows around Toca is key to designing an efficient and robust application. Having a good foundational knowledge will also help you understand what you should and shouldn't do when putting together the pieces of your application.
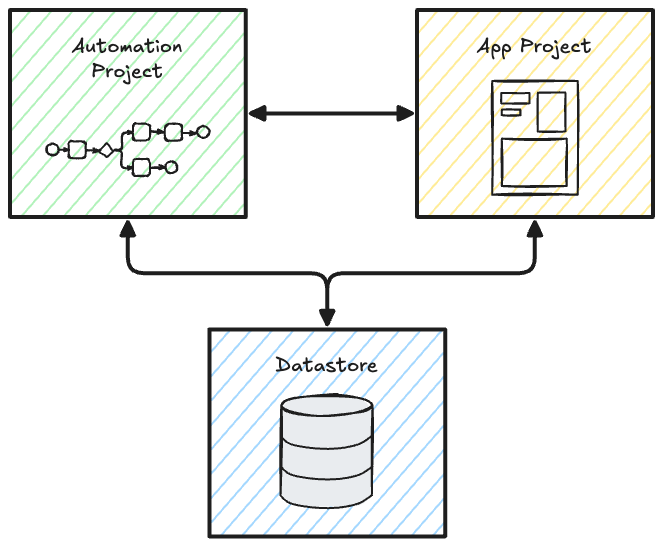
Linking Automation to Datastores
We'll first take a look at how you can link your automation to your data layer. Your automation can only see datastores that exist as part of the current project so to add a datastore to your current project you can either:
- Create a new Datastore within your automation project
- Link an existing datastore with your current automation project
Once you have linked a Datastore you can then use variables from within your Datastore in your automation activities and workflows! You can perform actions such as adding data to tables in your datastore, using passwords and identities from your Datastore to make authenticated API calls or use your Datastore as a remote file drive for processing files!
Let's take a look at how we link our automation and data.
Create a new Datastore
When you are viewing your current automation project, you'll see at the top of the project home page there is an "Add Datastore" button in the Datastore column. Clicking on this will open a wizard which allows you to create a new datastore or link an existing one.
To create a new datastore, make sure the New tab is highlighted in the wizard, give your datastore a meaningful name and description so you can easily find it later. Hit the CREATE button and you're good to go, you've just created a new datastores that is part of your automation project.
Link an Existing Datastore
Datastores can be shared across multiple automation projects, this is useful for sharing data between projects such as credentials to third party systems for example. To link an existing datastore to your current automation project, head to the home page of your automation project and click the "Add Datastore" button at the top in the Datastore column. This will open a wizard which has two tabs: "New" and "Existing"; Click on the "Existing" tab and select a Datastore from the dropdown which contains a list of other projects and their datastores.
Linking Apps to Datastores
If you want to display data from your Datastores inside an App, such as displaying data from a table in a table component or a chart or maybe driving a dropdown field with a list variable in a datastore, then you will need to link your App to your Datastore. Doing this will make the datastore a resource of the app and allow you to choose data directly from your linked datastore when configuring components and IPL actions inside your app.
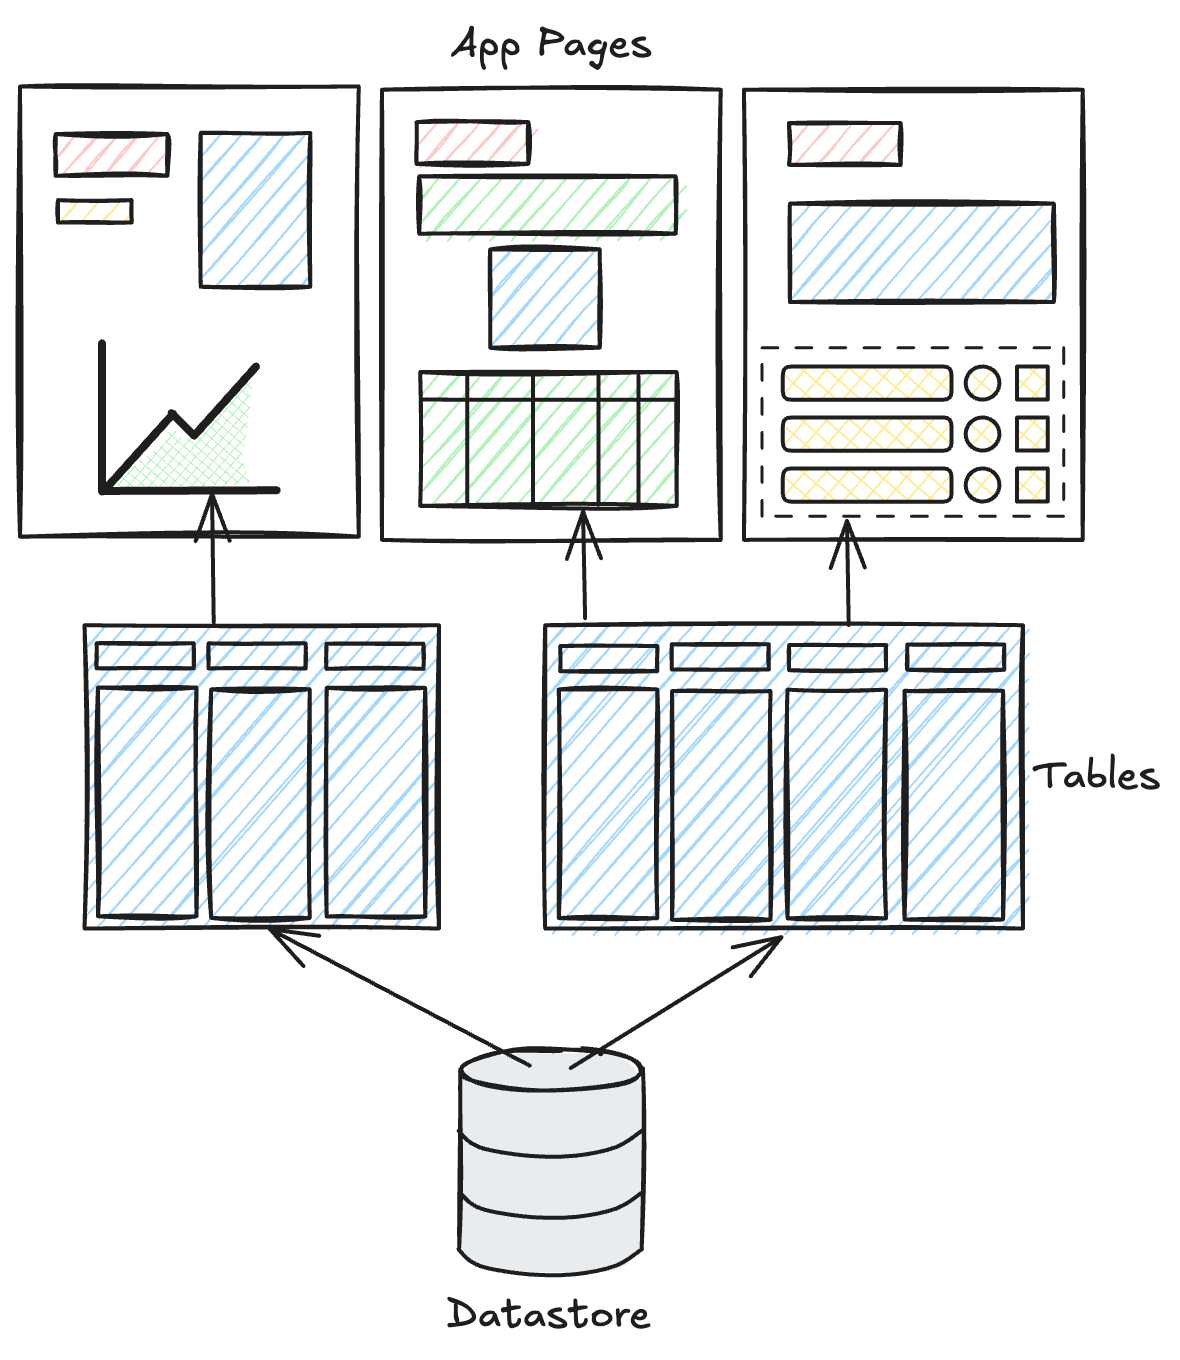
When you load data into a component on your page, particularly data from a table or view, you should be mindful of how much data you are loading in. For example, if you have a table which has 100,000 rows of data in it and you attempt to display all that data at once in a table component on your page, the performance of the page is likely to be pretty sluggish! Make sure you are always paginating your data where possible, all components which allow you to load tabular data will have options for pagination, allowing you to control how much data you load onto your page at once.
Linking Apps to Automation
If you want to run an automation workflow from an App, then you need to link your workflows to your App. This will allow you to:
- Trigger a workflow based on a user interacting with your app
- Define a form in your app that a user can set inputs for and trigger a workflow
- Display the outputs of a workflow in your App when the workflow finishes
Rather than linking with a Workflow directly, workflows are triggered via something called a listener. A listener turns your Workflow into an API that can be called from your App, and it will understand what inputs the listener requires and what outputs will be returned that are then available for the app to use.
Running Workflows via Listeners
A listener is something you can add to the start node of your workflow, it allows you to run the workflow by making a simple API call. You can then link a Listener with an App, this will then allow you to configure Form Layout components to trigger the listener when the form is submitted or use the Execute Listener app actions to run the listener through some IPL on your page.
To connect a listener to your app follow these steps when creating a new App:
- When you get to the "Linked project resources" section of the App Creation wizard, click in the Add Listener auto complete field.
- A list of all your listeners will appear before you, if you have already created a listener then you can select the listeners you want
- If not, scroll to the bottom of the auto complete suggestions and there will be an option to create a new listener
- Click
+ New Listenerand this will then allow you to select a workflow to add the listener to. Follow the wizard until the listener is created
If you want to connect a listener to a pre-existing app then:
- Head to the Settings tab on your App's project page
- Click on the App Resources tab on the settings section
- Click in the Add Listener auto complete field and then follow on the steps laid out
Inputs and Outputs
It is very common for the workflows that are triggered via Apps to have inputs and outputs defined on them. This is because:
- Your workflow needs to be driven by values defined by your app user
- The result of a workflow needs to be displayed in realtime back to the user
To accommodate this, workflows can have inputs and outputs defined on them, these are then accessible from your App so you can design text fields in your form layout to link with particular inputs of the workflow or you can display values from a form result, i.e. a workflow output.
A workflow's inputs and outputs are an accumulation of the inputs and outputs defined on the activities that are placed in the Workflow. This means that any inputs from the activities in your workflow can be defined by input fields in your app, and any outputs returned from the activities in your workflow can be used as the data driving components.
Common examples of how workflow outputs are used might be:
- A table output used to drive:
- A chart to visualise the data returned in the table
- A repeating layout to show the table as a list of results
- A table component to display the returned data as is
- A boolean output:
- A conditional content to show or hide content on your page
- A number output:
- A progress component to mark how something is progressing
You can access the outputs of a workflow that has been triggered from your app page by clicking the datachip selector (more on this in the next article) and then going to the Form Result tab, selecting the listener which was used to trigger the workflow and then finding the output value that you want and selecting it.
The Context Object
There are several places in the platform where data is returned from somewhere so that it can be used in the context of the current entity you are designing. Workflows illustrate this best, where the first activity in your workflow might return an output that you want to use in the second activity in the workflow. Dynamic pages in apps are another example of this where every component and app action on the page has access to the data from the current table row that is driving the page.
When you have these data objects, this is called context.
Context is what allows the last action in your activity to use a result from your first action in your activity. Context is what allows components placed inside a repeating layout component to access the data returned by the repeating layout. It is very useful to have a good understanding of where and how context manifests itself throughout the platform.
Apps
In apps, there are two main places that you have access to data in context. Dynamic pages and components placed inside data driven layout components such as Repeating Layout and Dynamic Data Wrapper.
You can access the context object in Apps by clicking on the datachip button {X} and selecting the Context tab.
Dynamic Pages
A dynamic page will generate a page for each row of a table. This means that a dynamic page will have a context object available to all components and app actions defined on the page. The context provided by a dynamic page will allow you to select any value from the current row of the table that the dynamic page represents.
Data Driven Layouts
There are certain layout components which allow you to define a layout which is driven by data. The most common of these data driven layouts are the:
- Repeating Layout - Returns a table of data, allowing you to define a design for each row of data in the table
- Dynamic Data Wrapper - Returns a single row of data, the query for this is usually dynamic rather than static
With these layouts, any components that are placed inside them will get access to the context that they return. This includes any app actions in IPL defined on these components.
Automation
The only place you really need to be aware of context in automation is in a workflow. The context in a workflow relates to:
- Any inputs injected when executing the workflow
- Any outputs from the activities within the workflow
All workflow inputs and activity outputs have a name (also called a key), to reference these values you just need to reference the key that corresponds to the value. For example, if Activity A in your workflow has an output called username then you need to specify that Activity B has an input called username and the value will flow from Activity A to Activity B.
Workflow inputs (which can originate from a listener, connector or you can manually specify the inputs when you run a workflow) are accessible from any nodes defined after the start node in a workflow. Activity outputs are only usable in nodes that follow activity they are returned from.