
Docs · Guide
Version Control System (VCS) in Workspaces
In Toca Version 10, Workspaces feature an integrated Version Control System (VCS). Powered by Git, VCS tracks and manages all changes made to your workspace entities over time. It provides an audit trail, safe rollback options, and parallel collaboration tools so multiple team members can build simultaneously without overwriting each other's work.
Key Functionality
| Capability | Description |
|---|---|
| History and Auditing | View a complete timeline of every change, including who made it, when and why. |
| Reversion | Roll your entire workspace back to any previous stable snapshot in time. |
| Branching and Merging | Create isolated workspace copies ("branches") to build features safely, then integrate them into main. |
| Conflict Resolution | Detect and visually resolve overlapping edits when multiple builders modify the same resource. |
| Remote repository | Connect to external Git platforms (GitHub, GitLab, Azure DevOps) to back up or clone workspaces across environments. |
How does the VCS work?
While Toca's version control is built on Git, no prior Git experience is required. Toca abstracts complex command-line actions into visual workspace tools.
Changes
Any modification made inside a workspace is tracked automatically in the Changes panel:
- Creating an entity (e.g. Activity, Workflow, App, App page)
- Updating an entity (e.g. adding actions to an activity, editing components on a page, altering nodes in an IPL flow)
- Deleting an entity (e.g. removing a Schedule, Workflow or App)
These changes are stored in a staging area, a draft zone where you can preview and group specific changes before committing them. As Toca is a collaborative development platform, you might also see changes from other users in this staging area. This is useful as you might be working on a task with several others and you want visibility of the changes that the others are making.
Commits
When you have got your workspace into a state you're happy with, you can commit the changes in your staging area. A commit saves a point-in-time snapshot of the selected staged changes in your workspace. Commits should represent an atomic unit of change - a complete, functional update (e.g. "Added navbar to app pages").
A commit is comprised of:
- The selected changes made since the previous commit
- The author of the commit
- A message relating to the commit
- A timestamp representing when the commit was created
This allows you to look back at your commit history and see what changes were introduced at each "snapshot", who introduced them and why they introduced them.
Why Commits Are Manual
Rather than saving every little change made to an activity or component move individually, manual commits let you group related modifications into a single meaningful update. This makes historical audit logs readable and allows you to revert entire features cleanly if needed.
Branches
Branches provide lightweight, isolated workspace environments where you can build and test changes without affecting your production application or fellow team members.
When you create a workspace, it starts on a primary branch named main (representing your stable, production development). Creating a new branch forks an independent copy of your workspace anchored to that exact moment in history.
[Feature Branch] ---> (Add New Integration) ---> (Update UI)
      /                                                       \
[main] -------------------------------------------------------------> (Merge & Deploy app)
Primary Use Cases
| Use Case | Description |
|---|---|
| Feature development | Build new apps, activities or datastore variables in complete isolation before launching them live. |
| Hotfixes & Bug Fixes | Safely isolate a critical bug fix on a separate branch, test it thoroughly, ande deploy it to production without bundling unfinished features. |
| Experimentation | Prototype complex automation or IPL logic without risk. If an approach fails, simply delete the branch. |
| Parallel collaboration | Enable multiple builders or teams to work on distinct modules of the same Toca workspace simultaneously without overwriting each other's configurations. |
Merging
Merging combines changes from a completed feature or fix branch back into your target branch (typically main).
To merge a branch:
- Open the VCS Panel in the workspace toolbar.
- Open the menu options and select Merge Branch.
- Choose your source branch and confirm the target branch.
- Select your Merge Strategy and confirm the merge.
Merge Strategies
Toca provides three merge strategies depending on how you want your commit history structured.
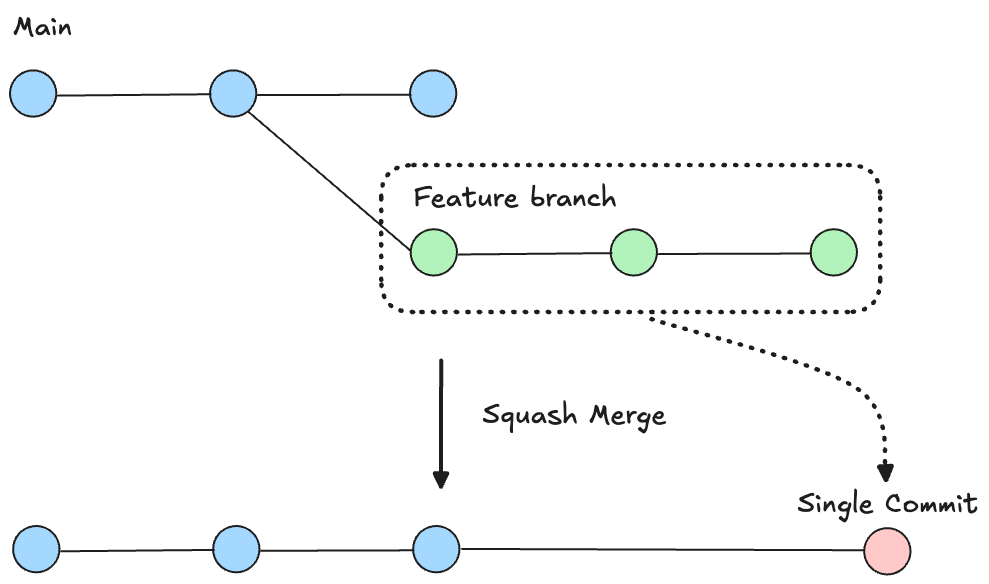
1. Squash Merge (Recommended for merging into main)
A squash merge takes all the individual commits on your source branch and condense them into a single, cohesive commit on the target branch. There is an option to delete your source branch after completing a squash merge, this is recommended to keep your workspace tidy.
This is the strategy used if you select to delete source branch in the basic mode.
- Why use it: Feature branches often contain messy interim commits (e.g. "Fix typo", "Adjust navbar margin", "Test connector response"). Squashing bundles all of these into one clean record, such as "Address user feedback".
- Best for: Merging completed feature branches or bug fixes into
mainto keep your production commit history tidy and easy to audit.
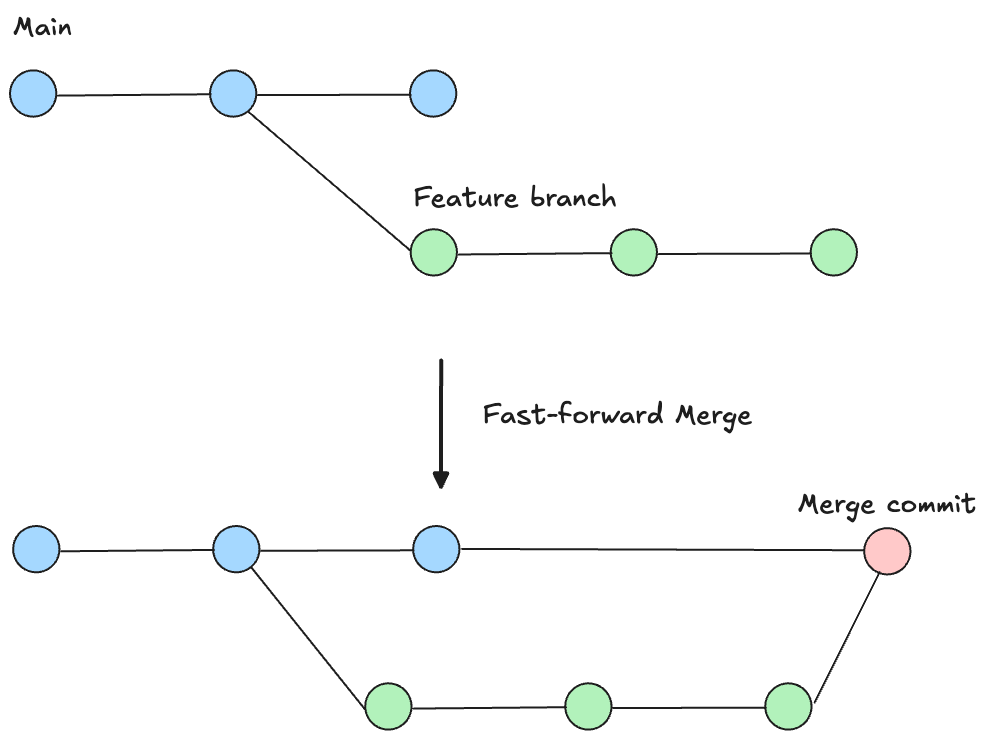
2. Fast-Forward
A fast-forward merge moved the target branch pointer directly forward to match the source branch, preserving every individual commit in chronological order without creating a separate merge commit.
This is the strategy used if you select to keep source branch in the basic mode.
- Why use it: It maintains the full, granular step-by-step history of how the work was developed.
- Best for: Merging feature branches into one another when multiple developers are collaborating on the same large initiative and need full visibility into every intermediate change.
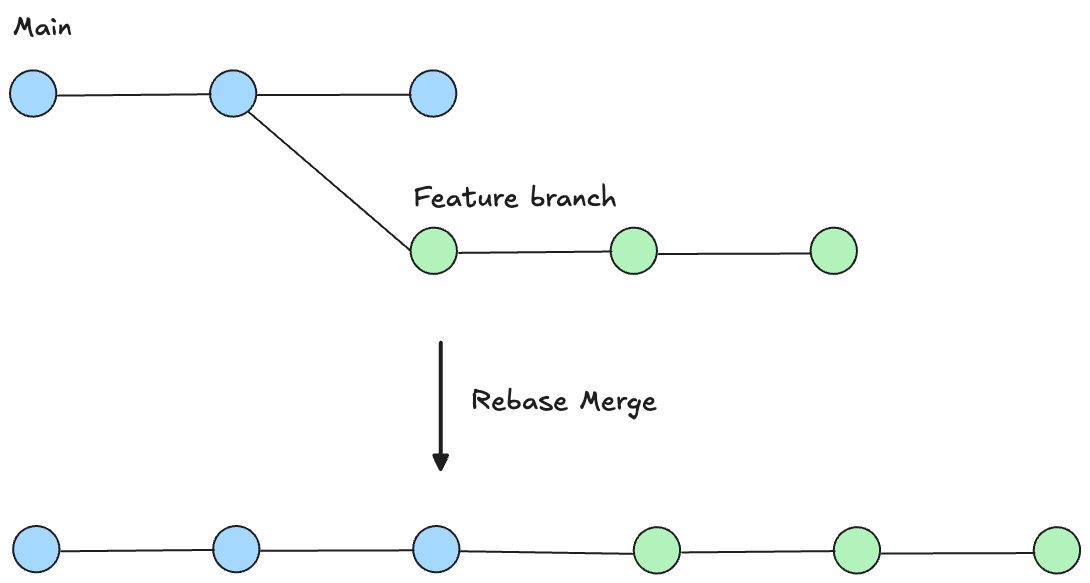
3. Rebase (Advanced - main only)
Rebasing takes the commits from your branch and replays them one-by-one directly on top of the latest commit on the target branch. In Toca, rebasing is an advanced workflow restricted strictly to merging into main.
- Why use it: It creates a perfectly straight, linear project history without merge commit bubbles, making it straightforward to trace history or bisect regressions
- When to be careful: Because commits are rewritten and re-applied sequentially, conflicts must be resolved commit-by-commit rather than all at once.
Conflicts & Resolution
A merge conflict occurs when the same property of an entity (such as a bot assignment in an activity or the margin of a text component) has been modified differently on both the source and target branches. When this happens, Toca pauses the merge so you can choose which changes to keep.
Resolution Options
When a conflict is detected, you will be presented with three choices:
- Use Source Changes: Overwrites the target branch property with the incoming branch change.
- Use Target Changes: Discards the incoming branch change and retains the existing target branch property.
- Manual Resolution (Advanced): Manually inspect and combine properties from both branches.
Here are some tips for reducing the likelihood of a conflict when you perform a merge:
- Keep branches small: Merge your work frequently in smaller increments. Small, focused merges are much faster to review and significantly reduce the chance of a merge conflict.
- Test before merging: Always preview and test your app and automation on your working branch prior to initiating a merge into your
mainbranch. - Sync regularly: Periodically pull updated from
maininto your feature branch so that your working branch never falls too far behind the rest of your team. - Delete completed branches: Once a feature branch or bug fix branch has been successfully merged, delete it to keep your workspace tidy and focused.
Reverting
Reverting allows you to restore your workspace branch to a previous commit snapshot if an update causes unexpected errors.
To revert to a previous state:
- Open the VCS Panel and select History.
- Browse the chronological commit log and select the desired snapshot.
- Review the changes introduced at that point and click Revert this commit.
Reverting to a particular commit will actually create a new commit at the head of your current branch. This is because in Git is designed around append-only history. Instead of erasing the past, the VCS undoes changes by adding an inverse action.
Remote Repositories
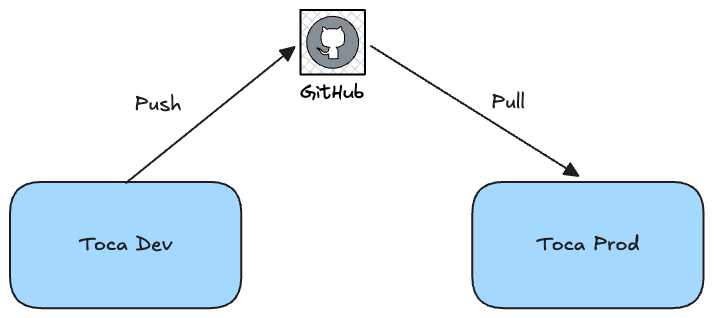
Connecting your Toca workspace to a remote Git repository (GitHub, GitLab, or Azure DevOps) creates an external backup and allows a workspace to exist on multiple Toca environments.
Connecting a Remote Repository
- Create an empty repository in your Git provider (don't initialise it with a README or .gitignore, it must be empty).
- Copy the HTTPS Clone URL
- Generate a Personal Access Token (PAT) in your Git provider with repository read/write. Each provider labels these permissions slightly differently but as long as you have permission to read, write and get the status of the repository then this should work.
- Navigate to Workspace Settings > Add remote repository in Toca, paste the URL and PAT, and save.
PATs typically expire after 6 to 12 months. Keep track of your token's expiration date. If it expires, Toca will display an authentication error message until updated in Workspace settings.
Syncing Changes: Push & Pull
- Pushing: Uploads your local workspace commits to the remote repository.
- Best Practice: Push at the end of a build session or when you want to push changes to another environment.
- Pulling: Downloads changes from the remote repository into your local Toca workspace.
- Best practice: Pull at the start of your workday or before deploying changes across environments.
There is a non-zero chance that you'll get a conflict when you pull. This is because pulling is effectively merging the remote branch with your local branch, so you can end up with merge conflicts if you've edited the same properties locally and on the remote branch. You can handle this as you would a regular merge conflict.
What is tracked in VCS?
Toca follows a clear operational rule for version control: Code and Configuration are tracked; Data and Credentials are not.
If an entity is tracked by the VCS, it means that any modification (adding, updating or removing) to an entity is then noticed by the VCS and you can commit the modifications. If something is not tracked then it means modifications will not appear in the changes panel and you cannot version modifications related to this.
Tracked Entities
- Workspaces: Core settings and ReadMe
- Automation Projects: Activities, Workflows (Listeners & Connectors), and Schedules.
- Apps: Pages (Components & IPL), Blocks, Settings, Themes, and Resources.
- Datastores: Table Schemas, View Configurations, Variables and Credential Names.
Untracked Entities
- Datastore Table Data (Row records)
- Credential values (Passwords, API Keys, Identity Tokens)
- App Users, Roles & Group Assignments
Datastore Branching & Migrations
To support testing schema updates without corrupting live application data, each branch maintains an isolated copy of your Datastore behind the scenes.
This does come with the side effect of increased disk space usage, so be mindful to delete your branches when you are no longer in need of it, this will keep your workspaces tidy in the interface and on the backend. When you create a new branch, you'll notice an option to copy the data records over, you can be selective about what tables to copy as well.
Schema Migrations
When you alter a table structure on a branch (e.g. adding or removing columns) and merge it into another branch, Toca automatically calculates and executes a schema migration. The target branch updates its database structure sequentially to match the source branch without destroying any records.
Variable & Data Tracking Matrix
Within a datastore, there is a slight difference to how each type of variable is tracked and it's important to be aware of the differences.
| Datastore Resource | What is tracked in VCS? | Data Transfer Tool Required? |
|---|---|---|
| Primitives (String, Number, Boolean, JSON, List) | Name, type and value | No (Tracked natively in VCS) |
| Tables | Name, type and schema | Yes (Use Data transfer/Export tool) |
| Views | Name, type and configuration | No (Views render dynamically from Table data) |
| Files | Nothing | Yes (Use Data transfer/Export tool) |
| Credentials (Passwords, Identities) | Name and type only | Manual entry required per environment |
You may be wondering why do we track these differently and the answer comes down to how we have seen these different resources used.
- Table data and files usually represent transient user driven data, should be unique per environment/branch
- Variables often represent configuration, booleans used to represent feature flags, numbers used to represent maximum number of retries and text used to represent templates used by automation
- Passwords and identities often represent environment specific API keys, passwords or 3rd party accounts
Data Transfer & Export
Because each branch maintains its own isolated data layer, Toca provides dedicated tools to move data across branches or environments:
- Data Copy on Branch Creation: When creating a new branch, select the table data and files you want to clone into the new branch
- Data Transfer Tool: Located in the Workspace Menu, this tool lets you sync table rows and files between existing branches at any point.
- Data Export / Import: Export table records and file drives as CSV, SQL or JSON files to transfer data between distinct Toca environments.
Disk space management: _Deleting a branch permanently removes its isolated datastore copy and associated file storage. Regularly prune merged or abandoned branches to optimise workspace storage.
Best Practices
Let's go through a few common scenarios to understand how we can leverage the VCS to improve the development experience.
Working on a feature
Your main branch currently contains what you would consider Version 1 of your project. It is running in production and you have many active users. You've received feedback from your users which you are implementing as a version 1.1. How would you do this with VCS?
- Create a new branch from the
mainbranch and give it an appropriate name, something likefeat/user-feedback. - When you create the new branch you may want to transfer across specific data from the
mainbranch as well so that you have some data to develop against - Once you have checked out and switched to your new branch,
feat/user-feedback, you can start addressing the feedback. - As you contribute changes to your new branch, the users on the
mainbranch will remain unimpacted by this. - Once you have finished your development, you can deploy your app on your branch to a custom slug and get your colleagues to help test it to make sure it is all working as expected.
- Once the testing has been signed off, you can then merge your
feat/user-feedbackbranch into yourmainbranch. This will bring over all your changes you made in your feature branch over into the production branch. - Deploy the app in your
mainbranch again so that the live app has your latest changes in
Merging into main instantly applies automation and datastore changes to production without a separate deploy step. To prevent live app users from encountering mismatched workflows or database schemas, undeploy your app before merging then redeploy once the merge is complete.
Pushing from one Toca instance to another
While branches provide isolated workspaces for day-to-day building, enterprise teams typically operate across at least two completely separate Toca instances: A Development environment and a Production environment.
When your work in Dev has passed QA and is ready for release, you use your shared remote Git repository to promote changes to Prod.
Prerequisites
- Both your Dev and Prod workspaces must be connected to the same remote Git repository via Workspace Settings > Add remote repository or New workspace > Clone from remote.
- PATs on both instances must be active with valid read/write scopes.
Step-by-Step promotion flow
- Finalise and merge in Dev: Complete your feature development, test your workflows thoroughly and merge your working branch into
mainon your Dev instance. - Push to Remote Repository: Open the VCS panel in your Dev workspace, make sure all relevant changes are committed and push to upload your latest
maincommits to the remote repo. - Pull updates onto Prod: Open the target workspace in your Prod instance and inspect the status bar for incoming updates (
↓indicator). When you see that there are changes to pull, click Pull on the VCS panel to apply the incoming commits.
Toca polls the remote repo once a minute. If incoming changes do not appear immediately, wait a moment or refresh your page in the browser to force a poll.
- Redeploy Apps: While automation and datastore schemas become live immediately once the pull is complete, apps require an explicit redeploy step.
Golden rules for Production
- Never build directly in Prod: All development, testing and hotfixes should originate in Dev. Making direct edits in Prod causes your branches to diverge, leading to complex merge conflicts when pulling from the remote repository.
- Keep Environments one-way: Follow a strict one-way flow:
Dev (Build & Commit) -> Push -> Remote Repo -> Pull -> Prod - Sync Configuration Secrets: Because credential values and passwords are not tracked by VCS, remember to manually set and update your credentials in Prod after pulling new credentials in.
Hot patching a live release
A hotfix is an unscheduled, high-priority patch applied directly to your production code to resolve a critical bug (e.g., a broken login flow, an unhandled authentication error, or an unhandled timeout automation).
In real-world building, critical bugs often strike at the least convenient time, usually when you are mid-way through building a new feature on a separate branch. This guide covers the best practices and step-by-step procedure to pause feature work, isolate and deploy a hotfix to main, and then seamlessly resume where you left off.
When you need to patch production immediately switch back to main, create an isolated hotfix/* branch, apply the fix, and release it.
Best practices for a hotfix
- Keep the scope surgical: A hotfix should address the critical defect and nothing else. Resist the temptation to refactor, tweak or enhance anything else.
- Always Branch off Clean
main: Always branch frommain(the current production state), never from an unreleased staging or feature branch. - Use Clear Naming Conventions: Prefix hotfix branches with
hotfix/followed by a concise description or bug ticket ID (e.g.hotfix/fix-connector-authenticationorhotfix/TICKET-3142). - Sync back to active features: After deploying the hotfix to your
mainbranch, immediately merge into your open feature branches so that your ongoing development doesn't drift our of sync. This is also how you avoid regressing this defect.
Step-by-Step Hotfix flow
- Secure your active feature work. Make sure you have saved any unsaved changes on your feature branch.
- Create a hotfix branch from
main. Click on the branch selector in the bottom bar and click+to create a new branch. Make sure the source branch ismainand give your branch an appropriate name. - Develop, test and commit the fix. Apply the minimal fix required to resolve the bug and test the fix thoroughly. Once the fix is signed off, commit the changes you have made with a descriptive commit message.
- Merge the hotfix into
main. In the VCS panel menu, click Merge branch. Make sure the source branch is your hotfix branch and the target branch ismain. Select Squash Merge as your merge strategy to keep your production commit history clean. Confirm the merge. - Redeploy the app if the fix requires it.
- Sync the fix into your feature branches. This is to ensure you don't regress or conflict on the fix later when your feature is finally merged. Open the VCS panel menu and click Merge branch. Set
mainas the source branch and your feature branch as the target branch. Complete the merge and now your feature branch includes both the in-progress feature work and the latest production hotfix.