
Docs · Projects
Authorization
Authorization
Users, Groups and Roles
The authorization framework uses the concept of Groups and Roles to manage access to resources and content in your app.
A Role is a named permission that can be placed on resources or content to restrict the level of access e.g. Manager, Contributor, Viewer.
A Group is a collection of one or more roles and a user is assigned to one or more groups. Some examples of groups might include Line Managers, Senior Engineers, Junior Engineers.
A user can then have one or more groups assigned to them and the roles are additive, meaning a user will always have every role from all the groups they are assigned to.
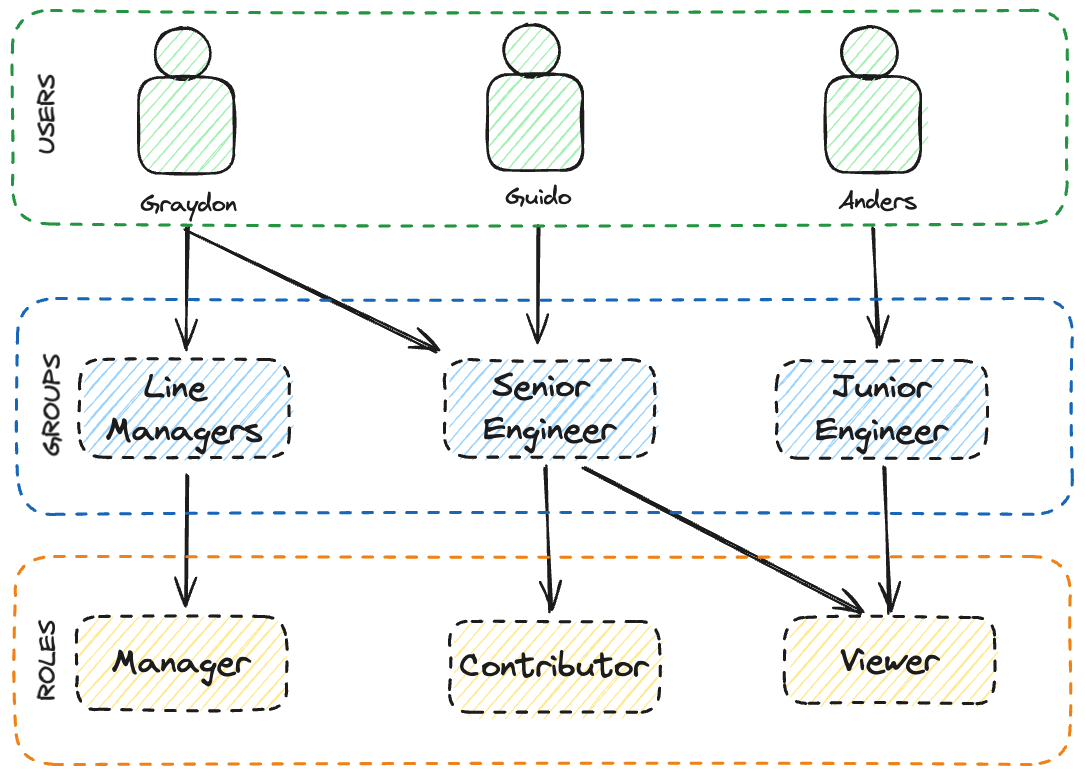
In the above example, Graydon is assigned to both the Line Manager group and the Senior Engineer group and as a result, he has access to all the roles.
Guido is only assigned to the Senior Engineer group, but as the Senior Engineer group is associated with both the Contributor and Viewer roles, he has both those permissions.
Finally, Anders is assigned to the Junior Engineer group so only has the Viewer role attributed with his user.
Default Group for New Users
When creating a group, it has the option to be the default group that is assigned to a user when they are authenticated, it is often a good idea to assign this option to the most basic Group to make sure that new users don't get elevated permissions before being assigned to their appropriate Groups.
Default Group for Unauthenticated Users
It can be a good idea to have a Group specially designated for unauthenticated users so that you can distinguish between unauthenticated users and authenticated users. There is an option when creating or editing a group to automatically assign a group to unauthenticated users.
Page Permissions
If your app has authentication enabled, then you have the option to restrict access to every page in your application. The following permission is available on pages.
| Resource | Permissions | Description |
|---|---|---|
| Page | Read | Read allows the user to view the the page |
You can assign specific Roles in your app to have the Read permission on each page, for example you might have a page that allows managers to approve annual leave and you only want users who have the Manager role to be able to view the page.
If a user does not have a role associated with their user that grants them Read access to the page then when they try to view it they will be directed to a 401 - Unauthorized if they are logged in or the Login page if they aren't.
N.B. If your App contains a login page then make sure you have not restricted access to this page as otherwise unauthenticated users will never be able to access the login page!
Resource Permissions
Once your app has authentication enabled, you are able to restrict access to the resources you have linked with your App.
The following permissions are available on each resource type:
| Resource | Permissions | Description |
|---|---|---|
| Listener | Read | Read allows the user to view the outputs of the listener in the App |
| Listener | Execute | Execute allows the logged in user to execute the listener to run a workflow |
| Datastore | Read | Read allows the logged in user to view data from the datastore in the App |
| Datastore | Write | Write allows the logged in user to directly write into the datastore |
By assigning Roles from your app the above permissions you can restrict the capabilities of each group of users. For example, this would be useful if you have a workflow that approves a pay rise and you want to restrict this to only be executed by users who have the Manager role.
If a user does not have permission to view content from a datastore then they will simply not see the content and if they attempt to execute a listener when they do not have permission to do so then it will fail to execute.
Read more about App Authentication.